Skip to content

Introduction to piano key top replacement
The piano is a beautiful instrument that brings joy and music to our lives. However, over time, the piano key tops can become worn out and lose their original beauty. If you notice that your piano’s key tops are starting to show signs of wear and tear, it may be time to consider replacing them.
In this ultimate piano key top replacement guide, we will explore why it is important to replace worn-out key tops, how to prepare for the replacement process, the different materials available for key tops, a step-by-step guide to replacing them, tips for a successful replacement, and how to maintain and care for your newly replaced piano key tops.
Why replace piano key tops?
Replacing piano key tops is essential to maintain the aesthetics and functionality of the instrument. Over time, key tops can become worn out, discolored, chipped, or cracked due to constant use, exposure to moisture, or aging. Besides affecting the overall appearance of your piano, worn-out key tops can also impact the playability and sound quality.
When the key tops are damaged, it can affect the touch and feel of the keys, making it difficult to play the piano accurately. By replacing the key tops, you can revive the beauty of your piano and ensure optimal performance.
Common signs of worn-out piano key tops
Before embarking on the replacement process, it is important to identify the signs that indicate your piano key tops need to be replaced. Some common signs of worn-out key tops include:
- Discoloration: If you notice that the color of your piano key tops has faded or changed significantly, it is a clear indication that they are worn out and need replacement.
- Chipping or cracking: Worn-out key tops may have visible chips or cracks, which not only affect the appearance but can also hinder smooth playing.
- Uneven or worn edges: If the edges of the key tops are uneven or worn, it can cause discomfort while playing and affect the overall performance.
- Sticky or slippery keys: When the key tops are worn out, they can become sticky or slippery, making it difficult to play with precision and control.
If you notice any of these signs, it is time to consider replacing your piano key tops to restore the beauty and functionality of your instrument.
Preparing for piano key top replacement
Before diving into the piano key top replacement process, it is important to gather the necessary tools and materials. Here is a list of items you will need:
- Replacement key tops: Depending on the make and model of your piano, you may need to order specific key tops. Make sure to measure the length and width of your existing key tops to ensure a proper fit.
- Adhesive: You will need a suitable adhesive to secure the new key tops to the piano keys. Choose an adhesive that is specifically designed for piano key top replacement.
- Razor blade or utility knife: A sharp blade will be necessary to remove the old key tops and clean the surface.
- Fine-grit sandpaper: Sandpaper will help smooth the surface of the keys before attaching the new key tops.
- Rubbing alcohol: This will be used to clean the keys and remove any residue before applying the adhesive.
- Cloth or paper towels: These will come in handy for cleaning and wiping the keys throughout the replacement process.
- Protective gloves: It is advisable to wear gloves to protect your hands from any adhesive or chemicals.
Once you have gathered all the necessary tools and materials, you are ready to proceed with the piano key top replacement process.
Understanding the different materials for piano key tops
When it comes to replacing piano key tops, there are various materials to choose from. The choice of material depends on personal preference, budget, and the desired aesthetics. Here are some common materials used for piano key tops:
- Ivory: Genuine ivory key tops were commonly used in older pianos. However, due to ethical concerns and regulations, ivory is no longer used. If you have an older piano with ivory key tops, it is best to consult a professional to explore your options.
- Synthetic ivory: Synthetic ivory is a popular alternative to genuine ivory. It closely mimics the look and feel of real ivory and is more readily available.
- Plastic: Plastic key tops are a more affordable option and come in a variety of colors and finishes. They are durable and require less maintenance compared to other materials.
- Wood: Some pianos feature key tops made of solid wood, such as ebony or rosewood. Wood key tops provide a unique and elegant look but may require more frequent maintenance.
Consider the aesthetic appeal, durability, and maintenance requirements of each material before making your decision.
Step-by-step guide to replacing piano key tops
Replacing piano key tops may seem like a daunting task, but with the right approach and attention to detail, it can be accomplished successfully. Follow this step-by-step guide to ensure a smooth replacement process:
- Remove the old key tops: Using a razor blade or utility knife, carefully lift the old key tops from the piano keys. Take your time to avoid damaging the keys or the surrounding areas.
- Clean the keys: Use rubbing alcohol and a cloth or paper towel to clean the keys thoroughly. Remove any residue or adhesive left behind by the old key tops.
- Prepare the new key tops: If necessary, cut the replacement key tops to the appropriate size, ensuring a proper fit. Sand the backside of the key tops lightly to create a rough surface for better adhesion.
- Apply adhesive: Follow the manufacturer’s instructions to apply the adhesive to the backside of the new key tops. Apply a thin, even layer of adhesive, ensuring complete coverage.
- Attach the new key tops: Carefully place the new key tops onto the piano keys, aligning them properly. Apply gentle pressure to ensure a secure bond between the key tops and the keys.
- Clean and polish: Use a cloth or paper towel to clean any excess adhesive and polish the newly replaced key tops. Take care not to scratch or damage the surface.
By following these steps, you can replace your piano key tops effectively and achieve professional-looking results.
Tips for a successful piano key top replacement
To ensure a successful piano key top replacement, keep the following tips in mind:
- Take your time: Rushing the process can lead to mistakes and unsatisfactory results. Approach the replacement process with patience and attention to detail.
- Measure accurately: Before ordering replacement key tops, measure the length and width of your existing key tops to ensure a proper fit.
- Work in a well-lit area: Proper lighting will help you see the details and ensure precise placement of the new key tops.
- Practice caution: Handling sharp blades and adhesive requires caution. Wear protective gloves and exercise care to avoid accidents or injuries.
- Seek professional help if needed: If you are unsure about any step in the process or have an antique piano with unique requirements, it is best to consult a professional piano technician for assistance.
By following these tips, you can enhance the success and satisfaction of your piano key top replacement project.
Maintaining and caring for your newly replaced piano key tops
Once you have successfully replaced your piano key tops, it is important to maintain and care for them to ensure their longevity and beauty. Here are some tips for maintaining and caring for your newly replaced piano key tops:
- Regular cleaning: Wipe the key tops regularly with a soft, damp cloth to remove dust, dirt, and fingerprints. Avoid using harsh chemicals or abrasive cleaners that can damage the surface.
- Avoid excessive moisture: Keep your piano away from areas with high humidity or direct exposure to sunlight. Excessive moisture can cause the key tops to warp or discolor over time.
- Protect from sharp objects: Avoid placing sharp objects or heavy items on the piano keys to prevent scratches or damage to the key tops.
- Use a key cover: When not in use, consider using a key cover to protect the key tops from dust and other contaminants.
- Schedule professional maintenance: Regularly schedule professional maintenance and tuning for your piano to ensure optimal performance and address any potential issues.
By following these maintenance tips, you can enjoy the beauty and functionality of your newly replaced piano key tops for years to come.
Finding professional piano key top replacement services
While replacing piano key tops can be a DIY project for some, it is advisable to seek professional assistance, especially if you have limited experience or an antique piano with unique requirements.
Professional piano technicians are skilled in key top replacement and can ensure a flawless result. When searching for professional piano key top replacement services, consider the following:
- Experience and expertise: Look for technicians with a proven track record in piano key top replacement. Check their credentials, certifications, and customer reviews.
- Specialization: Some technicians specialize in specific types of pianos or materials. Ensure that the technician you choose has experience working with your piano type and desired key top material.
- Consultation and estimates: Schedule consultations with multiple technicians to discuss your requirements and obtain estimates. Compare the options and choose the technician that best meets your needs.
By entrusting your piano key top replacement to professionals, you can have peace of mind knowing that your instrument is in capable hands.
Conclusion: Enjoy the beauty of your revived piano
Replacing worn-out piano key tops is a rewarding process that can revive the beauty and functionality of your piano. Whether you choose synthetic ivory, plastic, or wood key tops, the key is to approach the replacement process with patience, attention to detail, and the right tools and materials.
By following the step-by-step guide, tips, and maintenance recommendations outlined in this ultimate piano key top replacement guide, you can enjoy the beauty of your revived piano for years to come. So, take the first step towards reviving your piano’s beauty and embark on the journey of piano key top replacement today!
Related topics:
Steps for Repairing Piano Keys: A comprehensive Guide
Changing Piano Keys for great Performance
How to Clean Old Ivory Piano Keys Safely in 5 ways: The Ultimate Guide
Frequently Asked Questions
Can you replace piano key tops?
As a professional piano technician, one of the most common questions I receive is whether it is possible to replace piano key tops. The answer is yes, you can replace piano key tops. Piano key tops are the visible part of the keys that you press when playing the piano.
Over time, these key tops can become worn, discolored, or damaged. Fortunately, replacing them is a relatively simple process that can breathe new life into your piano.
To replace a piano key top, you will need to carefully remove the old key top without damaging the underlying key itself. This can be done by using a sharp knife or chisel to gently pry the old key top off. Once the old key top is removed, you can clean any residue or adhesive from the key using a mild solvent.
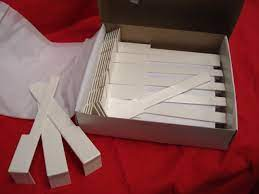
Next, you will need to measure the dimensions of the key and cut a new key top to fit. This can be done using a key top replacement kit, which includes pre-cut key tops in various sizes. Finally, you can attach the new key top to the key using a strong adhesive, making sure to align it properly before pressing down firmly.
What is the lid over the piano keys called?
The lid that covers the piano keys is called the fallboard. The fallboard is an important part of the piano’s design as it not only protects the keys when the piano is not in use but also serves as a decorative element. The fallboard is usually made of wood and is hinged at the back of the piano.
When the piano is open and ready to be played, the fallboard is lifted and rests on a ledge above the keys. When the piano is closed, the fallboard is lowered, covering the keys and protecting them from dust and other debris.
It is worth noting that some pianos may have additional lids or covers to further protect the keys. For instance, grand pianos often have a lid that can be opened or closed to control the volume and projection of the sound.
This lid is called the top lid or the music desk lid. It is important to keep the fallboard and any additional lids clean and free from moisture or excessive sunlight to maintain the integrity and appearance of the piano.
How do you replace a key on a piano?
If you find that a key on your piano is damaged or not functioning properly, you may need to replace it. While replacing a key on a piano can be a complex task best left to a professional piano technician, I will provide a general overview of the process.
To replace a key on a piano, you will first need to remove the key from the piano. This involves carefully disassembling the key mechanism and removing any screws or pins that hold the key in place. Once the key is removed, you can assess the extent of the damage and determine whether the key needs to be repaired or completely replaced.
If the key needs to be replaced, you will need to find a replacement key that matches the dimensions and design of the original key. This can often be obtained from piano supply companies or specialized piano technicians.
Once you have the replacement key, you can carefully insert it into the keybed and reassemble the key mechanism. It is important to ensure that the key is aligned properly and functions smoothly before completing the reassembly.
Replacing a key on a piano requires a high level of skill and knowledge, as well as specialized tools. Therefore, it is highly recommended to seek the assistance of a professional piano technician to ensure the proper replacement and functioning of the key.
What is the best glue for piano key tops?
When it comes to replacing piano key tops, choosing the right adhesive is crucial to ensure a strong and lasting bond. The best glue for piano key tops is a high-quality adhesive that is specifically designed for use with musical instruments. One such adhesive is cyanoacrylate glue, commonly known as super glue.
Super glue is a fast-drying adhesive that forms a strong bond between the key top and the key. It is important to use a small amount of super glue to avoid excess glue seeping out and causing damage to the key mechanism. Additionally, it is recommended to use a gel-based super glue as it provides better control and reduces the risk of accidental spills.
Another adhesive option for piano key tops is hide glue. Hide glue is a traditional adhesive that has been used in woodworking and instrument making for centuries.
It offers a strong bond and allows for easy disassembly and repairs in the future. However, hide glue requires heating and careful application, making it more time-consuming and less suitable for DIY key top replacement projects.
Ultimately, the choice of glue for piano key tops depends on personal preference and the specific requirements of the piano. It is always advisable to consult with a professional piano technician for guidance on the best adhesive to use for your piano.
Can I superglue a keyboard key?
Superglue, also known as cyanoacrylate glue, can be used to repair a keyboard key in certain situations. However, it is important to exercise caution and follow proper procedures to avoid causing further damage to the keyboard.
If a keyboard key has come loose or is not functioning properly, you can use a small amount of superglue to reattach it to the keyboard.
Before applying the glue, make sure to clean the key and the area where it attaches to the keyboard to ensure a clean and secure bond. Apply a small drop of superglue to the key or the keyboard, making sure to avoid excess glue that could seep into the mechanism.
It is essential to note that superglue should only be used as a temporary fix for a loose or damaged keyboard key. If the key continues to malfunction or if multiple keys are affected, it is best to consult a professional technician for a proper repair or replacement.
Remember, DIY repairs using superglue should be approached with caution, as excessive or improper use of the adhesive can lead to irreversible damage to the keyboard. When in doubt, seek professional assistance to ensure the longevity and proper functioning of your keyboard.
Conclusion
In conclusion, replacing piano key tops is indeed possible and can be done by carefully removing the old key top, cleaning the key, and attaching a new key top using a strong adhesive. The lid that covers the piano keys is called the fallboard, and it not only protects the keys but also adds to the piano’s aesthetic appeal.
If you need to replace a key on a piano, it is recommended to seek the assistance of a professional piano technician to ensure a proper replacement.
When it comes to gluing piano key tops, superglue or cyanoacrylate glue is a popular choice, providing a strong and lasting bond. However, caution should be exercised when using superglue on keyboard keys to avoid further damage.
Remember, if you have any doubts or concerns about replacing piano key tops or repairing keyboard keys, it is always best to consult with a professional piano technician who can provide expert advice and assistance.
CTA: Contact us today to schedule a consultation with our professional piano key top replacement services. Revive the beauty of your piano and enjoy its optimal performance
- Yuja Wang Family – All There is To Know! - June 4, 2024
- Top 10 Adjustable Piano Chairs in 2024 - June 2, 2024
- The 10 Most Popular Types of Jazz Piano You Need to Check Out! - May 31, 2024